Domain name change
FYI: Was able to secure the creativesustenance.com domain today, so we're deleting the old .net URL and activating the .com address. You should now be able to type creativesustenance.com to access the blogsite.
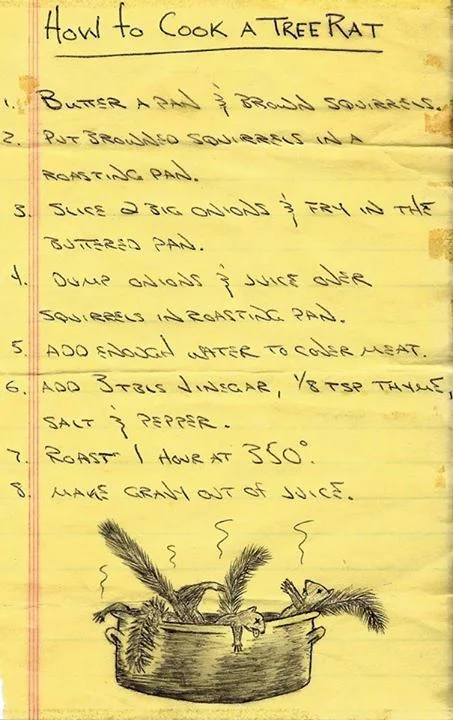
The lost recipe found!
One day, more than 20 years ago, I was sitting at the kitchen table in my Grandma and Grandpa's house in northern Wisconsin, after another successful morning of squirrel hunting in the woods on their property. I was doodling on a yellow pad of paper when my grandma asked me about all of the squirrel hunting I did and why I liked it so much. Ever since I was a wee lad I'd be out squirrel hunting whenever I could and probably shot and ate more squirrels from the woods adjoining both their farm and, later, the woods that surrounded the home they built after they sold the farm, than they might have imagined could possibly inhabit those forests.
Anyway, that afternoon my grandma asked me to write up a recipe for her, for how to cook squirrel. She surely wasn't asking because she needed to know. After all, she had spent much of her life cooking for her husband and herself, and their 11 children, as well as the constant flow of friends and extended family that always seemed to be a part of their daily life. I think she just asked me to write something up for her because she knew that hunting and cooking those critters was something I enjoyed, and that's what grandmothers do.
So, not having any idea, really, of how to actually record a recipe, this is what I came up with, my first written recipe for anything. I doodled a little picture at the bottom of the page and taped the paper to the inside of one of her cupboards, where it stayed for many years. One day, years later, I opened the cupboard to get a plate and noticed that the paper wasn't there anymore. I asked Grandma what had happened to it, but she didn't know nor even realized that it was missing. I was a little saddened by its disappearance, because it was a marker of sorts, an artifact of memory, so to speak.
An hour ago my brother posted on my facebook page a photo-scan of the recipe I had written all those years ago. Apparently he was the culprit who had swiped it from Grandma's cupboard! I'm glad he saved it. It's funny, as I look at it now and see how primitively and sparingly I wrote it.
Anyway, it made my day seeing this little piece of personal history again.
Addendum: The plot thickens! I shared this post* with my brother and he replied, "Last night Mom and Dad handed me the yellowing paper and said it fell out of one of Grandmas old cookbooks. I posted it for you to see... Killer of innocent Tree Varmints."
So, it appear that my bro did not pilfer the lost recipe after all. Grandma must have taken it down and secured it in one of her cookbooks for safe-keeping, which begs the question, did she not tell me that she had done so because she simply had forgotten that she had done so, or did she feign ignorance because she valued and wanted to keep the little paper her grandson wrote. I like to think the latter.
* I felt it proper to change the title of this post from "The stolen recipe found!" to "The lost recipe found!"
Chocolate Peanut Butter Pie
Here's a pie I made for Thanksgiving dinner last month.
I fiddled with this recipe just a bit by adding the chocolate and slightly adjusting the measurements, but credit for this lovely, easy-to-make pie goes to Allison Kave of First Prize Pies and Keavy Bleuher of Kumquat Cupcakery, who together founded a dessert and cocktail bar in Brooklyn called Butter & Scotch.
- Nutter Butter cookies, 1 dozen
- Butter, ½ stick, unsalted, melted
- Semi-sweet chocolate chips, ¾ cup
- Salt
- Creamy peanut butter, ¾ cup
- Cream cheese, ½ pkg (4 oz), room temperature
- Powdered sugar, ½ cup & ¼ cup
- Heavy cream, 2 cups
- Vanilla extract, 1 tsp
- Peanuts, ¼ cup chopped
1. Pulse the cookies and a pinch or two of salt to the consistency of sand in a food processor. Empty into a mixing bowl, add and mix in enough melted butter to pull it together. Press into a 9" pie dish, including up the sides. Freeze for 15 minutes and then bake at 350° for 8-10 minutes. Cool the crust until it hardens up.
2. Melt the chocolate in the microwave and gently pour into the pie dish. Pop into the fridge and allow to cool.
3. Combine and thoroughly mix the peanut butter, cream cheese and ½ cup powdered sugar.
4. Whip 1 cup of the heavy cream until stiff peaks form. Fold completely into the peanut butter mixture. Spread the peanut butter/whipped cream mixture into the pie dish. Allow to cool and harden up in the fridge for 30 minutes.
5. Whisk the other cup of heavy cream with the vanilla extract and remaining ¼ cup of powdered sugar until stiff peaks form. Spread over the pie in a rough manner, so that you have a tall, irregular topping. Sprinkle with the chopped peanuts.
I plan on making it every Thanksgiving...because it's awesome. Make it; you'll say it's awesome too.
Christmas chocolate torte
Over the last month I've shared some pictures on facebook of a few things we made for holiday meals, and was asked to also share the recipes. So, the next three or four blogposts will spotlight those recipes from Thanksgiving and Christmas. We'll start with a chocolate torte that we made again for Christmas this year. This torte has become one of my favorite holiday desserts. It's simple, very attractive and also very delicious. (My daughter brought a piece to one of her friends, who declared it "The best thing I've ever eaten!" Of course she was being generous with her compliment, but not by much!)
I got the recipe for this lovely torte years ago from a magazine of holiday recipes. What attracted me was the photo that accompanied the recipe, as it highlighted chocolate almond "pinecones" on a decorative and rustic topping. Here's how you do it.
To make the chocolate almond pinecones you'll need:
- almond paste (comes in a tube or small can...smells wonderful too)
- sliced almonds
- semi-sweet chocolate chips, about ½ cup
- shortening, 1 tbl
1. Form the almond paste into little cones, maybe a couple inches tall and an inch or so wide at the base.
2. Stick the sliced almond pieces into the cone in a pinecone-like formation.
3. Stick a swizzle stick or toothpick into the bottom to help hold onto the pinecone. Heat the chocolate chips and shortening in the microwave until liquified. Gently and slowly drizzle the chocolate, in a thin stream, over the pinecone, and use another toothpick or small artist's paintbrush to fill in the spots that the drizzling doesn't touch. Note: If you try to dip the cone or pour the chocolate on too heavily you'll just get a big bumpy chocolate blob. Be delicate and patient.
4. Place the finished pinecones on a wire rack to harden up. I put the rack in the freezer for a while. You can reuse these if you're careful with them. Place them in a small tupperware container and pop in the freezer until you want to use them again.
For the torte itself:
- Chocolate graham crackers, about 1½ cups
- Sugar, ¼ cup
- Butter, ½ stick or more, melted
- 9-inch springform pan
1. Combine chocolate graham crackers and sugar in food processor and pulse until the consistency of sand.
2. Dump contents into a bowl, add melted butter and mix well.
3. Press the mixture into the bottom of the springform pan and bake for about 8 minutes at 375°. Set aside to cool.
- Bittersweet chocolate, 4 ounce bar
- Semi-sweet chocolate chips, 4 ounces (about ½ cup)
- Baking chocolate, 4 ounces (if you want a lighter-colored top use white chocolate. This year I changed it up a bit and wanted a darker top, so I used dark chocolate)
- Plain (flavorless) gelatin, 1 packet (¼ ounce)
- Egg yolks, 5 or 6
- Sugar, ¼ cup
- Half-&-Half, 1 cup
- Heavy whipping cream, 2 cups
1. Add gelatin to about a ¼ cup of water and let it sit.
2. Add each of the chocolates to a separate mixing bowl. You might briefly microwave them to soften the chocolate up.
3. Add the egg yolks to another mixing bowl and beat them until fluffy. Add the ¼ cup of sugar and continue beating until well mixed. Follow that by adding and mixing the half-&-half. Pour the mixture into a saucepan and heat to 160°. Remove from heat and add the gelatin. Stir to combine.
4. Pour a third of the hot egg yolk/sugar/cream mixture into each of the three bowls of chocolate. Stir to thoroughly mix and melt the chocolate. Allow everything to cool for about 15 minutes.
5. In a mixing bowl whip the heavy cream until it achieves stiffness and peaks form. This will build endurance and strength in your forearms and wrists if you do it with a hand whisk.
6. Loosely and gently fold a third of the whipped cream into each of the bowls of chocolate. Saving the lightest colored chocolate mixture for last, pour one bowl into the springform pan, smooth it out with a rubber spatula and pop it in the freezer until it's pretty firm. Add the next bowl and do the same, freezing it until it's firm. Then do the same with the last, lightly colored chocolate mixture.
7. While the torte is in the freezer melt some semi-sweet chocolate and fill a brine syringe or something similar with the melted chocolate. Take the torte from the freezer and make some decorative leaf and branch designs on the surface with the melted chocolate. Squirt some melted chocolate on the bottom of the chocolate almond pinecones and place them on top as well.
8. Be gentle when removing the sides of the springform pan from the torte. Also, while slicing through the torte itself is very easy, you may have to use some force when you get to the graham cracker crust; be firm but gentle.
There you go, a chocolate dessert that everyone will be impressed with.
Squirrel & red wine chili
Wintertime is chili time, and my winter chili demands game meats when possible. Venison chili is of course a favorite, but any game will do, whether venison, grouse, rabbit, raccoon or, in this case, squirrel. I had a large bowl of squirrel loins and ribs in the fridge, which are every bit as tasty as the thighs and forequarters, but have a smaller meat to bone ratio, which makes them great for something like chili or making stock.
Squirrel and red wine chili
The other key ingredient to this particular chili is a wine I made from some grapes my friend Marty gave me last year. The wine itself was good, and I thought it would nicely compliment the rich, dark meat goodness of the squirrel. My Dad also gave me a giant can of red beans the other day from a dented can store he frequents near his cottage, so I didn't need to soak or cook any dried beans.
Chili lends itself to improvisation, and that's what this recipe is, but it's pretty close to the recipe I used to win a little chili competition a few years ago.
Ingredients (quantities are very loose for this, and depend on what I've got on hand and what suits my mood at the time):
- Meat - could be anything or any combination of things. I used a couple pounds of squirrel, a few pieces of thick bacon, and a bit of ground beef. Sausage, like venison sausage, also works real well.
- Beans - any kind or combination of beans. I've made this with northern beans, white beans, black beans, etc. For this batch I used a couple cups of canned dark red kidney beans, rinsed.
- Diced tomatoes - one 28 oz. can.
- Tomato sauce - one pint jar of homemade sauce.
- Tomato paste - 3 or 4 tbl.
- Green salsa - homemade, 1/2 cup.
- Sweet corn - 1 cup.
- Mushrooms - about 2 cups sliced.
- Celery - 1/2 cup, diced
- Onion - 2 or 3 medium sized, roughly chopped.
- Garlic - several cloves (maybe half-a-head), diced.
- Hot peppers - a few, sliced small
- Spices and flavorings - smoked salt, pepper, pimenton, cayenne, cumin, bay leaf, hot sauce, couple tsp fish sauce.
- Red wine - couple cups.
- Corn starch or flour to thicken.
- Cook meat in a skillet in bacon fat, low and slow until tender and seasoned with salt, pepper and cayenne. Separate meat from any bones. Chop it up to the size you prefer.
- Add meat to a large kettle. Toss the mushrooms, celery and onions into the still-hot skillet, leaving the fond from the meat in the pan, season as you see fit, and cook until they start to soften. Add the garlic and peppers and cook for a few more minutes.
- Add skillet contents to the kettle of meat and begin heating at a medium temperature.
- Add beans, sweet corn, salsa, diced tomatoes, tomato sauce and paste, fish sauce, hot sauce, red wine. Simmer until all the ingredients get friendly with one another. You can thicken the chili if you feel the need, by stirring in a bit of flour or corn starch. I'm constantly tasting and adding seasoning or heat (hot sauce) as I go along. I also made a small quantity of broth from the squirrel bones while preparing the chili, in case I felt I needed to add more liquid. I didn't need it, so I'll use it in some other manner, probably in a soup.
I turn the heat down to the lowest setting and let the pot sit on the stove for a few hours, slowly getting better and better, visiting to fill a bowl every now and again. Of course you can add cheese and/or sour cream when you dish it up. It just gets better the longer it sits.
Winter
It is "officially" winter here along the lakeshore of Wisconsin. To my mind winter has not truly arrived, no matter what the calendar date, until we get our first good snow, the kind of snow that completely covers the grass and sticks around for at least a few days of cold, blustery weather. We got that very thing a few days ago.
It's been cold. The thermometer has been hovering around 10°F during the day and below 0° at night. I've worried a little about the ducks, even though I know they can handle the cold so long as they're out of the wind. Still, they spend a lot of time on their bellies, often walking just a few feet in the snow before dropping to the ground for several minutes to warm their duck feet beneath their bodies.
The ducks are easy to catch now too, which I do ever so often when I go out to feed them or chip the ice from their water pails and refill with warm tap water. Where in the warm months they'd lead me on a comic chase if I tried to catch one, now they just seem to look at me with an expression that says, "It's too cold to run through this snow so go ahead and pick me up if you must. Just don't get the idea that I enjoy it." Whichever one I happen to capture, I'll hold his or her cold webbed feet in my hands to try to warm them up a bit, or place her in the larger plastic tub filled with warm water. They really enjoy being in the water, bathing, splashing, quacking happily. I imagine the warm water feels good, but they sometimes seem hesitant at hopping up into the tub themselves in the cold weather. I don't know why. Maybe it just requires too much effort at a time when energy conservation is a priority. When they hop out of the tub the water freezes on their feathers in tiny beads of ice.
I also like to think that during winter the normal hierarchical pecking and antagonism between the older and younger males abates a little bit. The conflict continues, but it seems less contentious and mean now that it's become too cold for the old man to chase the young fella too far. This is a time of year when the proximity of other warm bodies perhaps overcomes instinctual pecking order issues.
Winter. I love it. I love being outside, in the quiet woods, at streams of defiantly flowing water, with snow covering and muffling everything. It's the time of year when a stand of snow-covered pines seems cozy; when cinnamon and wood smoke smell even more wonderful than they normally do; when hot coffee, brandy and cream is a favorite breakfast drink; when I quietly thank the person who invented flannel bed sheets. It's the time of year when we prefer candlelight to electricity, when having friends over for company is even nicer, when we feel like actually writing an honest-to-goodness letter with pen on paper, and when hugs serve a dual purpose of warming the spirit and the body.
It's that time of year when it's easy to catch ducks.
Squirrel & Mushroom Pizza
My daughter works at an Italian restaurant and the other day she brought home a little bag of pizza dough that was left over at the end of the night. I also had a loin and ribs in the fridge from some squirrel I hadn't cooked yet (I've got to start sharing my squirrel recipes...one of my favorite game meats). Well, the two bowls, of dough and squirrel meat, were looking like they wanted to be friends.
Squirrel & mushroom pizza.
I split the dough up and made enough for three small pizzas with added onion, mushrooms, greens and olive oil. Delish!
Sumac, another use: za'atar spice mix
Every Cub Scout or Boy Scout knows that a sweet/tart Kool-Aid-like tea can be made from fresh staghorn sumac berry clusters. You can also make sumac wine, jellies and other foodstuffs from sumac. Two or three weeks ago I harvested a small late season basket of semi-dry sumac berries for one specific purpose: I wanted to make a batch of za'atar, a spice blend popular in Middle Eastern cooking.
Staghorn sumac berry clusters. These berries have started to dry and are mostly past their prime for making fresh tea, but they're still good as a spice.
I had read that za'atar is put to good use when combined with olive oil as a seasoned dipping oil for bread - we love bread and oil as an appetizer or snack - as well as a seasoning for meat such as lamb or goat.
Za'atar is a spice blend that can be purchased through just about any spice company, as is sumac alone. You certainly could make your own za'atar blend by combining purchased herbs and spices. It's such a simple and easy blend to make, usually combining less than a half-dozen ingredients. But we're all about using as many ingredients as we can from non-commercial sources, such as from a garden, foraging, bartering and so on.
Note: We're not opposed to purchasing food items from the grocery store or from any commercial source, not at all - we strongly support buying quality food from quality sources - but rather because we're also in favor of saving a buck here and there, of doing things that you can do via your own effort and creativity, and of simply having fun while pursuing a more self-sufficient lifestyle.
Anyway, making a spice blend with herbs from the garden and foraged sumac is one of those small activities that yields both home-grown flavor and a good dose of fun in the making.
While there are variations to the recipe, basic za'atar ingredients include:
- sumac
- thyme
- sesame seeds
- sea salt
- oregano
Oregano, thyme, sumac, sesame seeds.
Oregano is actually one of those ingredients that is not considered essential, but is occasionally added to some blends. I had dried oregano from this year's garden and thought it would be a nice addition, so added it to the mix.
The processing of the sumac berries is the only real time consuming part of the recipe, and it's about as easy as falling off a log:
Strip the sumac berries from the clusters and toss them in a food processor. Pulse repeatedly until all of the fuzzy stuff is nicely pulverized and almost powdery. Pour the processed sumac into a sieve with holes of a size that will allow the fluffy stuff to sift through but that will retain the small, BB-like sumac seeds. I found that a standard hand sieve or strainer worked just fine. You want the seeds out, because they're as hard as rocks. Then toss the good stuff back into the food processor and run it again to grind it down even more finely. Sift it again. And then sift it again. And again. No seeds...you don't want someone cracking a tooth on one of the little beasties.
I processed enough sumac to yield about a ½ cup of dried, processed sumac berry. I think it required around 8 or 10 berry clusters.
Next, I added 3 or 4 tablespoons of dried thyme, 1 heaping tablespoon dried oregano, about 3 tablespoons of lightly toasted sesame seeds, and 1½ teaspoons sea salt. I toasted the sesame seeds in a hot cast-iron skillet for a few minutes, shaking it constantly until they became fragrant and lightly browned. Then I quickly and not too rigorously pulverized most of them with mortar and pestle. Stir everything together or put it in a tupperware container and shake it until it's mixed. That's it.
Taste it and make adjustments where you think it needs it. I ended up adding a bit more sumac because I like the tartness. I immediately made some dipping oil by adding some olive oil and grated parmesan, and soaked it up with chunks of italian bread while watching an old episode of Bizarre Foods with Andrew Zimmern (love that show). I'm also anxious to use the blend as a rub for a bit of goat I've got in the freezer; I think it would do well with that meat.
Beechnuts - a union break from shelling
I'm really just making this blogpost as an excuse to take a break from the finger-fatiguing work of shelling beechnuts. Beechnuts are one of my favorite wild nuts to eat, but also one of the most tedious to shell. They're tiny, a challenge to hang onto, and require a little more finesse, and therefore focus, than, say, butternuts or walnuts, which you can just whack with a hammer. Beechnuts need to practically be peeled from their smooth three-sided carapace. Not a job for a blunt instrument or a distracted frame of mind.
A small pile of even smaller autumn beechnuts.
My process is, in fact, to peel one of the three sides with a knife while pinching the back-side joint of the other two sides with the fingers of my other hand. I peel from upper point downward to the bulbous bottom, hopefully removing the shell side in one piece, whereupon I hope to use my thumbnails to pry apart the remaining shell sides to release the nutmeat within, whole. That's the way it usually works anyway, and the nut will practically fall out of its little teepee. Once in a while though, it requires more effort with the knife edge on one of the other shell sides.
Here's a nutmeat (center foreground) revealing itself from its shell after I peeled one side off (it's still attached, like a drawbridge). The three leaves of a shell lie around another nutmeat to the right. Whole unshelled nuts on the left and shelled nutmeats on the upper right.
It's not necessarily a slow process. I can average two or three beechnuts per minute, depending on their size and how smoothly I'm able to perform the initial cut. But when the reward is a nutmeat the size of a pea and an hour worth of concentrated effort yields a third of a cup, it can seem more tedious than it probably actually is. But isn't it true that the best things often require the most effort?
Shelled beechnuts. The papery skin, or testa, should be removed if possible. I'll rub a handful of nuts gently together between my palms to loosen the testa and then winnow it away.
Well, breaks over...back to work. I'll share how we use these beechnuts in the kitchen when we're done shelling. Talk to you again in a few months then I guess.
Fairy ring mushrooms
The last couple weeks have been rainy and moderate with temperatures in the mid to upper 40s. We've had a day or two where the sun peeked through and the temps climbed into the 50s, but each morning when I've gone out to feed the ducks I've looked at the sky and wondered if today was the day we'd get our first good snow.
While working in the yard to clean things up before everything gets covered with snow (a job that the sensible part of me thinks is entirely ridiculous, but which my OCD side nevertheless frets over) I discovered a patch of scattered fairy ring mushrooms, Marasmius oreades, hiding behind the beehive at the edge of the pines in the front of the house.
Fairy Ring mushrooms, Marasmius oreades.
Unless I get lucky and find some late season maitaki this might be the last hurrah for edible mushrooms for the year. Coming upon the fairy rings was a lovely little surprise and made for a pleasant spur-of-the-moment breakfast for my wife and me.
Fairy Ring mushrooms are a common lawn mushroom and may appear from spring through autumn. They're small, 1" to 3" tall and an inch or two wide at the cap. The caps are light tan or cream-colored, bell shaped when young, but becoming more planar as they age and often displaying a pronounced central bump or "umbo" on top, making them look kind of like tiny, wide-brimmed hats. The gills are generally a little lighter in color than the cap, and are free, or unattached from the stalk (or, as most books indicate, only slightly attached...but I've not seen any yet that are attached). The spore print is white or cream colored.
Fairy ring caps and a couple of spore prints.
Close-up of fairy ring spore prints. Click to enlarge.
The stalk is a major identifying feature of the fairy mushroom. It is very slender, shows no significant variation in diameter from top to bottom, and no ring, volva or veil. The real telling feature of the stalk, though, is its resiliency. It's a tough, fibrous little bugger, not easily broken or snapped in two, able to be bent and twisted with some force. The character of the stalk is important to remember in properly identifying fairy ring mushrooms.
The almost unbreakable stalk of the fairy ring mushroom.
It will usually either bend, as it is in this image, or crimp, as in the image above this one.
Here I twisted it back and forth until it separated, showing its stringy, fibrous interior.
Given what I just said about the stalk of the fairy mushroom it might be obvious that it is the cap that is the desired edible part of the fungi. When you collect them use a scissors and just snip the caps off. They are also a lightly fragrant mushroom, especially whilst being sauteed in butter. There's an almost herbal, very subtly floral mushroomy scent to them. They are fantastic.
Oh, and they may be about the easiest and most favorable mushroom to dry for long-term storage.
Unfortunately, there weren't enough in the yard this day to bother drying. There were just enough to fill an omelet for breakfast. And I'm quite happy with that.